Tuesday, 22 May 2012

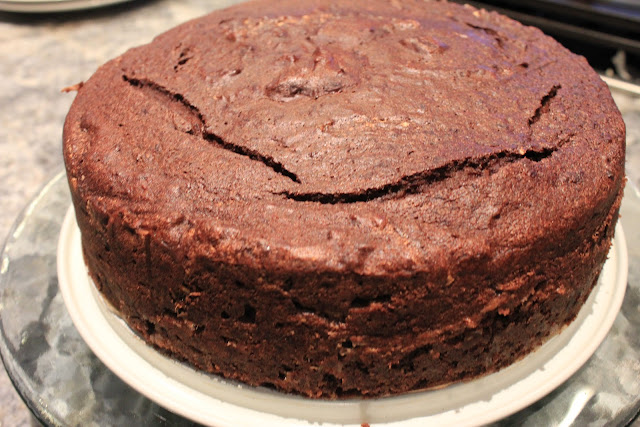
Chocolate Beetroot Cake (FAIL)


If you are at all enthralled by the title of this post, don't be.


Vegetables and chocolate... it is such a nice thought, it really is. I appreciate the effort. And beets? I love them too, I really do. But this recipe was a disappointment. 


There, I've said it. You've been warned. 


This recipe, I'm sure, was made by an obsessive fan of all moist zucchini loaves, who so ignorantly believed the marriage between treat and vegetable would be as harmonious in all situations. 


It is not. 


Furthermore, this post is a reminder to all baking souls out there: you must follow your instinct. Sure, a request is fabulous if it inspires you, if it opens your eyes to new flavour combinations that you never imagined, and makes you a better baker at the end. But a request that makes you feel uncomfortable, one that goes against the grain of your very baking-being... just pass it by. 


I learned that lesson the hard way. 


If the beet wasn't enough of an indication, the dark chocolate should have been.  


There are recipes that rightly glorify dark chocolate, ones that are perfectly paired with tart raspberries, and those that are balanced out by generous amounts of butter, icing sugar, or ganache. Neither happened in this case. 


Dark chocolate with beet is not so glorious. 


If you are starting to think that this cake won't taste great, you're right. 


But it was fun to take pictures of. Here is when we combined the chocolate-beet mixture with half of the stiffly whipped eggs.


There was so much more! Not the easiest to mix without ruining the texture of the ultra fluffy eggs. (Complaints, complaints, I know. Hard to see past the work when the end result was so disappointing!)


And here, finally, the result. 


Admittedly, we took this out of the oven before we should have. Everyone had trekked over for family dinner and the cake was sacrificed for the sake of time. 


See? A liiiiiiiiittle underdone. 


But here is the WEIRDEST THING. It was the middle, the undercooked, unintentionally jiggly part that was the tastiest.


The part that was cooked as it should have been? It was dry, chalky chocolate flavour and totally uninspiring. 


I feel like this is the cake's way of sending me a message as a baker: stop putting vegetables in your cakes and definitely stop making things you don't want to make. 


They will always suck. 


So don't try to be a bunny if you're a cat!


Although, for the record, I am definitely not a cat. 


I like to envision myself as something more akin, in looks and character, to this heavenly creature:


!!!!!


No, just kidding. I could never grow such phenomenal facial hair, no matter how hard I tried.


One can dream though! 

Caramel Brownie Cheesecake


Caramel Brownie Cheesecake


I really do love Smitten Kitchen


I was spending quality time on their website earlier this week, under the assumption that I had no time to make a birthday cake for my boyfriend who I was heading to see on the weekend. I mean, I was like super busy and had just resolved that it was totally understandable if I showed up without a delicious goodie in my arms. 


But then I saw this recipe.


There are thousands of recipes on that blog and it makes me feel almost frightened that, had fate not intervened, I might have never seen this recipe.


Someone was looking out for me that day. 


And they directed me to my cheesecake-brownie filled destiny.


So my blog has fabulously documented my growth from brownie-confusionist to brownie-affectionato. As it stands currently, I am feeling pretty damn good about this little chocolatey squares. And I'm feeling even better about my ability to make devour-able ones. 


And here they are, wedded to Cheesecake. 


*Hallelujah*


There were many revelations that happened during my journey to make this cheesecake. The first was seriously life changing. 


Up until this adventure, I knew of only two suitable non-pastry crusts: oreo, and graham crackers. 


Seriously. This was my world: "Ahhh, oreo.... or graham cracker?"


How limiting! But then the recipe called for some Teddy Grahams... I have broken free and with one little change to my baking repertoire I have opened my eyes to endless opportunities!


I have the power to crush up anything I could possibly want and turn that bad boy into a crust. 


I am so inspired right. now. You have no idea how many crusts I am envisioning. 


Get excited.


Now, back to the cheesecake. 


As you can see, I did run a little low on Teddy Grahams (may they rest in peace, in my belly) and so I thickened up the base with some regular graham crackers. 


I like my crusts thick! 


The recipe uses brownies that are something other than the best so I corrected that oversight. I made the TO DIE FOR Caramel Brownies and mixed the caramel in so that the caramel flavour with penetrate to each and every corner of the fudgie cube. 


Next I made my cheesecake batter. Is that the proper word? Batter? I do not know. Which leads me to my next point... or, rather, more appropriately called, my next confession. 


I don't like cheesecake. 


Gasp! I know. It shocks me as much as it shocks everyone that I tell. I love so many treats yet there is a monstrous field of desserts that I intentionally steer clear of, that everyone else seems to think is like the most amazing thing ever.


Believe me, I wish I liked cheesecake. It's like I pulled the short straw on this taste preference.


I don't like cheesecake (it doesn't get easier, no matter how many times I say it) but I do know that basically everyone else I know does. So when I need a party pleaser, you can guess where I turn. 


Now, this cheesecake was really quite liquified! I was concerned that I had done something wrong but it turned out to work in my favour. 


How? Oh, you will see. 


I found myself standing on the edge of decadence and, as per usual, I dove right on in. I had a whole batch of caramel brownies sitting there - would I save some of them to be eaten in between finger licking pauses? Or to be stored in tin containers until all that was left from the sneaking and nibbling was indistinguishable morsels? Or would I gift them to hungry friends and helpful neighbours?


Or would I put all of them in the cheesecake birthday cake?


Heck, I poured them all in. 


There was a moment. Oh, and it was such a tiny, insignificant moment! Anyone other than the most absolutely perceptive dessert lover would have missed it. It was in that moment that I asked myself: am I putting in too many brownies?


But, as I said, it was just a moment. All of those brownies went in. 


The cheesecake willingly devoured the brownies and coated each and every available surface. 


And I just kept pouring in those brownies! I gently folded them in until they were as covered as possible (there was a lot of brownie ground to cover!) and then I baked it. 


The best thing about a cake like this is it will last forever (in a freezer) - if you can resist the temptation to eat it, that is! I had to take this cake on a 4 hour trip to my boyfriend's house and I needed it to be as protected as possible. So I froze it! Here it is, looking chilly. 


I put the cake in it's spring pan and then wrapped it in plastic wrap and tin foil, to keep it super protected, before tossing it in the bottom of my bag for the trip. It arrived perfectly! It managed to look reasonably presentable and definitely edible. 


Here it is - loaded with brownies - coated with a layer of milk chocolate ganache!


Enjoy, you cheesecake and brownie lovers!


Caramel Brownie Cheesecake 
adapted from Smitten Kitchen 


Crust


I have to admit, I don't measure how much butter or cookies I use when making a crust. I go by look and feel! Pour in the cookies, add some melted butter, add more if necessary. 


Cheesecake Filling 


24 oz cream cheese, softened
4 large eggs
1 teaspoon vanilla 
1/2 cup sugar
3/4 brown sugar
Caramel Brownies 


Bake at 350 F for 45 minutes. Apparently a cheesecake is done when there is still a slight jiggle in the middle when it's shaken. Mine was solid after 40 minutes. Perhaps it's because of the scaffolding of brownies that was inside? Likely.


and yes, this is how my puppy sleeps... when he is not snoring. 


Saturday, 5 May 2012

Lemon Yoghurt Loaf


Man, there are a LOT of baking blogs out there. 


Somewhere between the waiting dirty dishes, the tempting dripping caramel, and the gentle hum of ice cream churning, I lost myself. 


Where do I fit in this over-crowded world of homemade baking and self-absorbed blogging? 


It seems that every recipe is covered, every idea already thought of, the best photos have been taken, and each delicious modification already tasted. 


A million blogs and what makes mine... dare I say it... special?  


I pondered on this thought for longer than, well, I probably should have. Because, in the end, I didn't even have a good answer. I just put the worries aside and got back in the kitchen.


You know why? Because baking makes me happy! Like this ecstatic bulldog, who looks like he has never had a better day in his life. Ever. and I appreciate that. 


And blogging about it makes me feel like I have a friend in the kitchen with me!


Except it's a friend who doesn't make any suggestions along the way...


Or tell me how I should bake healthier things, use less butter and chocolate, or add vegetables to my cakes (more on that soon)... 


And they don't tell me what they'd like to eat or about how much they don't like what I'm about to make


... and they most definitely don't get in my way. 


Because it's my kitchen.


So, I followed humbly in one of my favourite blogger's footsteps and made her Lemon Yoghurt Loaf


Last weekend was the MS Walk and I offered to bake a treat for everyone who dragged their butt out of bed before 8 on a Sunday. 


Goodness knows, a treat for that is always needed. 


The only other time such early Sunday behaviour is acceptable is when one has a date at an always-busy, yet totally-worth-it-spot, like Medina. As I just so happen to have next weekend... GLEE!


Back to the lemon loaf. 


By now, we all know that I LOVE lemons. And this recipe was easy-peasy and lemony delicious. 


I only wish that I had taken it out of the oven 5 minutes earlier. I believe my oven has a mood disorder because in the last week it has both undercooked and overcooked what I've put in there in the amount of time that I expected it to do the opposite. 


We're going to get it re-calibrated. 


Lemon Yoghurt Loaf


1 1/2 cups of flour
2 teaspoons baking powder
1/2 teaspoon salt
1 cup plain whole-milk yoghurt
1 cup and 1 tablespoon sugar
3 large eggs
2 teaspoons grated lemon zest... 2 very generous teaspoons!! 
1/2 teaspoons pure lemon extract
1/2 vegetable oil 


Preheat oven to 350. Cook for 50 minutes. Or, if your oven is having a "hot" day, try 40 minutes. 


Butter and lightly flour an 8 by 4 by 2 1/2 inch loaf pan, adding parchment paper to the bottom. 


Mix flour, baking powder, and salt in a bowl. Whisk yoghurt, 1 cup sugar, eggs, lemon zest, vanilla, and oil in another bowl. Slowly whisk the dry ingredients into the wet ingredients. 


Pour the batter into your prepared pan... et voila! 


Once the cake is done, leave it to cool for 10 minutes before turning it out onto a rack. 


To make a glaze, use 1/3 cup of freshly squeezed lemon juice and 1 tablespoon of sugar in a small sauce pan. I used a full lemon's juice, closer to 1/2 cup of lemon juice, or even more. Naturally, I didn't measure it because I was in a winging-it mood and the result was no glaze, rather a sweetened lemon juice that my loaf willingly gobbled up.


I know this loaf could have been moister but no one who ate it had any criticisms - in fact, it was all compliments! 


And, while I usually quickly move on from a recipe once I've made it once, I think I might make this again. Conveniently, there are a million variations (slight exaggeration) - all of which I plan to tackle.


Enjoy your loaf! 


Monday, 23 April 2012

Dark Chocolate Crinkle Cookies

Dark Chocolate Crinkle Cookies - beautiful, inside and out


There is something so absolutely satisfying about the look of a crinkly cookie with its white coating cracked to show the deep chocolate colour underneath. I don't know what I like more, the crunchy, crackly, ice sugar-coated outside or the soft, rich, and unexpectedly-gooey inside. 


Must I choose? 


I think not. 


I found the recipe through Pinterest -again, because it's awesome. It's from Divine Baking and was apparently posted because the blogger has an obsession with her mixer. 


which I respect.


Before we get to the recipe, a completely FLOURLESS delight, allow me to show you what the cookies look like let-loose in the wild:


Oh wait - that's just a squishy little black bear covered in snow! Forgive me for confusing the two. 

Recipe:

2 oz bittersweet chocolate
2.5 oz unsweetened chocolate
3/4 cups chocolate chips (preferably unsweetened or bittersweet!) 
3 large egg whites
2 1/4 cups icing sugar (divide into 2 separate bowls)
1/2 cup unsweetened cocoa powder
1 tablespoon cornstarch
1/4 teaspoon salt

Bake for 10 minutes in the oven at 350 F, until they "puff" up. 

Lightly butter a large cookie sheet. 

Melt bittersweet and unsweetened chocolate in a heatproof bowl over top of a boiling pot of water. 

Beat egg whites on high until they form stiff peaks. Gradually add in 1 and 1/4 cups of icing sugar into the egg whites. Continue beating until they form a marshmallow-like cream. 

Whisk 1 cup icing sugar, cocoa, cornstarch, and salt in a bowl until fully blended. Slowly add dry ingredients to the meringue, beating slowly. Stir in 3/4 cups chocolate chips and the luke warm chocolate. 

The mixture is ready once it is fully combined and very stiff! 

Pour 1/2 cup to 1 cup of icing sugar into a bowl and then get ready to get your hands dirty! Actually. Really very dirty. The dough came off on my sister and I's warm hands as we rolled the it into medium sized balls...

Prepare yourself!


Roll the dough in your hands into little balls (no matter what size cookie you want, just make sure you are consistent!) and then roll them into the bowl of icing sugar. Cover completely with sugar! The more the better, as long as it is actually sticking to the cookie. 


The crinkle effect will be most a effective if the cookies are fully coated in icing sugar pre-baking, because once the cookies puff up in the oven you will want the difference between the icing sugar white and the dark chocolate black to be distinctive!


Like this!


Just like the bear! 


Don't they look fabulous? And all bear references aside, these cookies were my best reviewed yet! They have a deep rich flavour, and look slightly more sophisticated than a lot of what I have been dishing out these days. i.e. oreos and caramel galore. 
My little sister was at first turned off by the crusty outside... until she met the inside and then it was like her little secret and she didn't want anyone else to have one. 


And I can't blame her for that. If I hadn't impressed myself so much with these little guys then I might have kept them a secret too!

But I was never much good at being modest.

Especially when you make something that is FANTASTIC.


Will I be making them again?

Is that even a question? 

Sunday, 22 April 2012

Oreo Brownies

Oreo Brownies - for the panda in everyone. 


I started working out again, after a multi-month hiatus. I am in the process of doing a life spring cleaning, so to speak. All of those things I have been saying I'd do, well, I'm actually doing them! 


Start baking blog. Check. 


Bake brownies, successfully. Check. 


Bake a delicious summery pie... Coming soon!!


Gym..... ch-eck?


A little background here: I can pretty much come up with any excuse for not going to the gym. There are an inordinate amount of things I didn't even realize I needed to do until, well, "go to the gym" showed up on my day planner. 


But I must watch another episode of Sons of Anarchy first! 


(key word here being another


Or, heaven forbid, that I miss out on a cuddle with my puppy! 


You see, the gym can always wait. 


But, my optimistic spring cleaning has forced me into my runners and onto the treadmill.


Fabulously, I discovered, I can find excuses to stop working out at the gym even while I am already at the gym.


This is my favourite, and most subtle: 10 minutes into the work out and, damnnnnn girl, I realize that I am looking mighty fine! I catch a glimpse of myself in the mirror and steady flow of (silent) self-compliments get started. Only a few minutes into the work out and I am feeling so good about myself that I just don't see the point of staying any longer. 


BAM. Done. Workout successfully shortened. 


It is seriously the most reliable, subconscious workout shortener that I have ever encountered. And that's a pretty long list, I'll tell you. 


Shorter gym time means I can turn to my other goals. Ones that require no excuses - to do, or to get out of.  


Such as making brownies. Brownies with oreos in them.  


Recipe:


3 oz bittersweet chocolate
5 oz unsweetened chocolate
3/4 cups butter
4 eggs
1 teaspoon vanilla extract
1 cup flour
a pinch of salt
1/2 cup of white chocolate chips (or more?)
1 bag of double stuffed Oreos


Cook for 25 - 30 minutes, until the brownies have set, at 325 F.


Melt the chocolate and butter together. I read a little article which I now can NOT track down on the importance of not over heating the chocolate. 


Essentially, to sum up, do not over heat the chocolate.  


I melt everything in a metal bowl that sits on top of a pot of boiling water. You have to be careful that the boiling water does not touch the bottom of the bowl. The steam alone will heat the chocolate. Stirring helps the chocolate melt quickly. 


Allow the chocolate mixture to cool slightly and then pour 1/3 of it into your eggs, sugar and vanilla. Whisk whisk whisk!! Then add both wet mixtures together in a large bowl and fold in the flour. 


Once everything is mixed together, pour half of the batter into your pre-buttered and light floured pan (mine is a 7x7). On top of that, add a full row of Oreos. 


Then we smashed up the rest of the Oreos and folded them, along with 1/2 cup of white chocolate chips, into the remaining half of the brownie batter. 


Pour that baby on top. 


And swirl prettily. 


My only wish - dare I say regret? - was that I had left the mixture sit, right now, like it is, for 10 or 20 minutes before putting it in the oven. 


Why? I wanted soft Oreos! I have this strange love for stale, soft Oreos. Perhaps because as a kid I always took forever to get through a bag? and those last precious Oreos were always delightfully soft? It's likely. Or maybe it's because the milk dipping always made them soft. And eating them without milk just feels kind of wrong. 


The Oreos in these brownies are crunchy, which is kind of fun, especially in combination with the soft moist brownie it is hugged by... But I would just love to see how they'd turn out with just a little bit of time to soften pre-oven. 


Next time!


But, in the mean time...


Don't you think they look like little pandas? 


These pandas look like they had one too many Oreo Brownies. 


Can't really blame them, can you?


The similarities are endless! 


And since I can't have a baby panda, even though I would very much like one, I can at least have a panda-inspired brownie, or two. 


Enjoy!