Monday, 23 April 2012

Dark Chocolate Crinkle Cookies

Dark Chocolate Crinkle Cookies - beautiful, inside and out


There is something so absolutely satisfying about the look of a crinkly cookie with its white coating cracked to show the deep chocolate colour underneath. I don't know what I like more, the crunchy, crackly, ice sugar-coated outside or the soft, rich, and unexpectedly-gooey inside. 


Must I choose? 


I think not. 


I found the recipe through Pinterest -again, because it's awesome. It's from Divine Baking and was apparently posted because the blogger has an obsession with her mixer. 


which I respect.


Before we get to the recipe, a completely FLOURLESS delight, allow me to show you what the cookies look like let-loose in the wild:


Oh wait - that's just a squishy little black bear covered in snow! Forgive me for confusing the two. 

Recipe:

2 oz bittersweet chocolate
2.5 oz unsweetened chocolate
3/4 cups chocolate chips (preferably unsweetened or bittersweet!) 
3 large egg whites
2 1/4 cups icing sugar (divide into 2 separate bowls)
1/2 cup unsweetened cocoa powder
1 tablespoon cornstarch
1/4 teaspoon salt

Bake for 10 minutes in the oven at 350 F, until they "puff" up. 

Lightly butter a large cookie sheet. 

Melt bittersweet and unsweetened chocolate in a heatproof bowl over top of a boiling pot of water. 

Beat egg whites on high until they form stiff peaks. Gradually add in 1 and 1/4 cups of icing sugar into the egg whites. Continue beating until they form a marshmallow-like cream. 

Whisk 1 cup icing sugar, cocoa, cornstarch, and salt in a bowl until fully blended. Slowly add dry ingredients to the meringue, beating slowly. Stir in 3/4 cups chocolate chips and the luke warm chocolate. 

The mixture is ready once it is fully combined and very stiff! 

Pour 1/2 cup to 1 cup of icing sugar into a bowl and then get ready to get your hands dirty! Actually. Really very dirty. The dough came off on my sister and I's warm hands as we rolled the it into medium sized balls...

Prepare yourself!


Roll the dough in your hands into little balls (no matter what size cookie you want, just make sure you are consistent!) and then roll them into the bowl of icing sugar. Cover completely with sugar! The more the better, as long as it is actually sticking to the cookie. 


The crinkle effect will be most a effective if the cookies are fully coated in icing sugar pre-baking, because once the cookies puff up in the oven you will want the difference between the icing sugar white and the dark chocolate black to be distinctive!


Like this!


Just like the bear! 


Don't they look fabulous? And all bear references aside, these cookies were my best reviewed yet! They have a deep rich flavour, and look slightly more sophisticated than a lot of what I have been dishing out these days. i.e. oreos and caramel galore. 
My little sister was at first turned off by the crusty outside... until she met the inside and then it was like her little secret and she didn't want anyone else to have one. 


And I can't blame her for that. If I hadn't impressed myself so much with these little guys then I might have kept them a secret too!

But I was never much good at being modest.

Especially when you make something that is FANTASTIC.


Will I be making them again?

Is that even a question? 

Sunday, 22 April 2012

Oreo Brownies

Oreo Brownies - for the panda in everyone. 


I started working out again, after a multi-month hiatus. I am in the process of doing a life spring cleaning, so to speak. All of those things I have been saying I'd do, well, I'm actually doing them! 


Start baking blog. Check. 


Bake brownies, successfully. Check. 


Bake a delicious summery pie... Coming soon!!


Gym..... ch-eck?


A little background here: I can pretty much come up with any excuse for not going to the gym. There are an inordinate amount of things I didn't even realize I needed to do until, well, "go to the gym" showed up on my day planner. 


But I must watch another episode of Sons of Anarchy first! 


(key word here being another


Or, heaven forbid, that I miss out on a cuddle with my puppy! 


You see, the gym can always wait. 


But, my optimistic spring cleaning has forced me into my runners and onto the treadmill.


Fabulously, I discovered, I can find excuses to stop working out at the gym even while I am already at the gym.


This is my favourite, and most subtle: 10 minutes into the work out and, damnnnnn girl, I realize that I am looking mighty fine! I catch a glimpse of myself in the mirror and steady flow of (silent) self-compliments get started. Only a few minutes into the work out and I am feeling so good about myself that I just don't see the point of staying any longer. 


BAM. Done. Workout successfully shortened. 


It is seriously the most reliable, subconscious workout shortener that I have ever encountered. And that's a pretty long list, I'll tell you. 


Shorter gym time means I can turn to my other goals. Ones that require no excuses - to do, or to get out of.  


Such as making brownies. Brownies with oreos in them.  


Recipe:


3 oz bittersweet chocolate
5 oz unsweetened chocolate
3/4 cups butter
4 eggs
1 teaspoon vanilla extract
1 cup flour
a pinch of salt
1/2 cup of white chocolate chips (or more?)
1 bag of double stuffed Oreos


Cook for 25 - 30 minutes, until the brownies have set, at 325 F.


Melt the chocolate and butter together. I read a little article which I now can NOT track down on the importance of not over heating the chocolate. 


Essentially, to sum up, do not over heat the chocolate.  


I melt everything in a metal bowl that sits on top of a pot of boiling water. You have to be careful that the boiling water does not touch the bottom of the bowl. The steam alone will heat the chocolate. Stirring helps the chocolate melt quickly. 


Allow the chocolate mixture to cool slightly and then pour 1/3 of it into your eggs, sugar and vanilla. Whisk whisk whisk!! Then add both wet mixtures together in a large bowl and fold in the flour. 


Once everything is mixed together, pour half of the batter into your pre-buttered and light floured pan (mine is a 7x7). On top of that, add a full row of Oreos. 


Then we smashed up the rest of the Oreos and folded them, along with 1/2 cup of white chocolate chips, into the remaining half of the brownie batter. 


Pour that baby on top. 


And swirl prettily. 


My only wish - dare I say regret? - was that I had left the mixture sit, right now, like it is, for 10 or 20 minutes before putting it in the oven. 


Why? I wanted soft Oreos! I have this strange love for stale, soft Oreos. Perhaps because as a kid I always took forever to get through a bag? and those last precious Oreos were always delightfully soft? It's likely. Or maybe it's because the milk dipping always made them soft. And eating them without milk just feels kind of wrong. 


The Oreos in these brownies are crunchy, which is kind of fun, especially in combination with the soft moist brownie it is hugged by... But I would just love to see how they'd turn out with just a little bit of time to soften pre-oven. 


Next time!


But, in the mean time...


Don't you think they look like little pandas? 


These pandas look like they had one too many Oreo Brownies. 


Can't really blame them, can you?


The similarities are endless! 


And since I can't have a baby panda, even though I would very much like one, I can at least have a panda-inspired brownie, or two. 


Enjoy!

Caramel Chocolate Chip Cookie Squares

I have to admit that this is a bit of a consolation recipe. 


Last week, I had HUGE aspirations of creating a beautiful union of chocolate cheesecake, caramel, and soft chocolate chip cookies in the most delightful and aesthetic of 1.5 by 1.5 inch squares.  Despite a thorough search on Pinterest, Google, AllRecipes, and even my most trusted baking blogs, I found no recipe to satisfy my growing desire to bake such a multitude of goodness in one pan. 


So I decided to make one up.


And, as often happens in such situations, my ambition exceeded my ability.


What resulted was an on-the-go, little bit of this, little bit of that, toss it in the oven and cross my fingers. 


aka. chocolate chip cookie base, caramel layer, chocolate cheesecake layer, caramel layer and then cookie bits crumbled on top (photo to the right), all of which took an infinite amount of time to bake and even then I wasn't sure I had done it properly, or thoroughly. 


Seriously. Constant checking. Constant indecision.


It tasted good though.


Or so I am told. 


I was so rattled by the challenge of cooking thoroughly through to the bottom of this massive square without burning the top (added a tin foil covering at some point) and my uncertainty of whether or not I had successfully cooked the cheesecake and trying to figure if it had "set" with those huge caramel layers keeping everything wiggly when hot...


It took me a few days to recover my cookie confidence! 


Required many naps and cuddles. And pictures of pugs. 


Alas, I am back. And determined, as always, although waveringly, to discover the best combination of treats possible.


However, I think I will stick to established recipes. 


For now.  


Chocolate Cheesecake Caramel Chocolate Chip Cookie bars, I will perfect you! And when I do, it will be fully documented on the blog. 


Embracing my inner Beyonce-like Baker. All sass. All confidence. 


This is what fearless looks like. 


And this dude, who is casually playing with a shark... :| 


and, almost, kind of like this:


baking the same thing that shook my confidence last week (minus the cheesecake, because I am a chicken) and it being awesome! 


Alright, still not quite fearless. But I'm getting there.  


Bring on the Caramel Chocolate Chip Cookie Squares!


This was the part of the recipe last week that I actually enjoyed. It serves as a fabulously basic chocolate chip cookie recipe, simple to whip up and one that is over-flowing with chocolate chips. Seriously. So many chocolate goodies. I found it through Pinterest and got the recipe at Two Peas and Their Pod. Nice site, right?


Recipe


Cookie:
2 1/8 cups all-purpose flour
1/2 teaspoon salt
1/2 teaspoon baking soda
12 tablespoons of butter
1 cup brown sugar
1/2 cup sugar
1 egg
1 egg yolk
2 teaspoons vanilla extract
2 cups chocolate chips (THIS IS A LOT and IT'S AMAZING)


Caramel:
1/4 cup sugar
1/4 cup brown sugar
2 tablespoons butter
1/3 cup whipping cream
*optional add: 10 - 15 individually wrapped caramel candy squares (unwrapped)


Pre-heat the oven to 325 F. I used a 9 x 12 pan, lightly buttered. 


Add flour, salt and baking soda together, whisking so that they are fully combined. 


In a separated bowl, mix melted butter and sugars until fully combined. This is easiest in an electric mixer. Add the egg, egg yolk, and vanilla extract. Mix until smooth and then add the dry ingredients, while mixing slowly. Once everything is just combined, stir in chocolate chips. Be careful not to over mix. 


Make the Caramel layer. Girl just can't get enough. As you may have noticed, I have used this fail-safe caramel more than once. Refer to my Caramel Brownie post to see a detailed how-to. 


The original recipe called for melting caramel candy squares with sweetened condensed milk. But I just can't stand the smell of hot condensed milk. I have made banofee pie and love it when it's cold but I just can't stand the smell when it's cooking - anyone else feel that way? 


I compromised by adding those caramel candies into my own mixture. I thought it might thicken it? I'm not sure it had much of an effect in that respect, but it certainly made more caramel over-all.


Do I need another reason to use them? It was obviously worth it. 


Press half of the cookie dough into your pan, covering it completely.


Remember how I said there were like a million chocolate chips in this recipe? 


I put some of them into their own layer. There were just far too many to reasonable fold into the dough, or so I thought. I could be wrong. But I usually forget those instances and instead blissfully like to believe that I am often... hmm, no, to be more accurately, I am always correct.  


And who doesn't want a chocolate chip layer? See, again, I am always right. 


Oh, and I also did 1 cup of big chocolate chips and 1 cup of minis in the whole recipe.  


It makes it 10 times better that way.


Next you add the caramel. All of it. Do not be shy. 


What?! Why the heck an I eating leaves?! 


Must. Refrain. From. Eating. Caramel. for now. 


Crumble cookie layer on top... while subtly licking caramel from every unnoticeable source. Okay, a few noticeable sources too. 


Toss that thing in the oven NOW so that you can take them out again in 30 minutes. 


aka eat them in 30 minutes. 


Although, you should perhaps wait a moment or two for them to cool down first. 


Okay, so you can eat them in 32 minutes. 

Second best to eating them is ogling photos of the finished product. ommm nommmm. 


Remember that chocolate chip layer? 


Well it wouldn't let you forget it even if you tried! 


There it is, literally shouting to get your attention. 


It says:


EAT ME.  


NOW, please.  


You oblige. Cannot resist chocolate oozing to surface. 


And if you manage to save some squares for later (I commend your self-restraint), they will even manage to look delectable while being stored right side up, sideways, and upside down in a cheap little tupperware! 

Impressive! 


Excuse me while I lick the oozing chocolate and caramel from my fingers. 


and from around my face. 


much like this. 


Monday, 16 April 2012

Decorated Cones

Decorated Cones 
- a little left over chocolate and a whole lot of sprinkles 


There isn't too much to say about these little guys, other than the fact that I had too much fun decorating them. 

Which is pretty obvious. 


Who doesn't love sprinkles? 

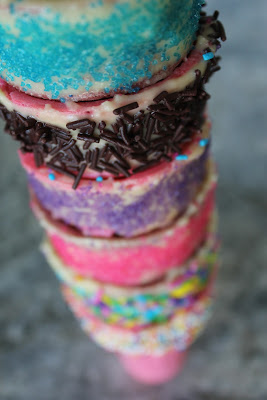
I dipped the cones in melted white chocolate and then sprinkled on a little colour. 

My sister got pretty excited when she saw these and it's definitely an activity we'll do again in the future. 


Someone once told me that these cones are made at paper mills... out of paper. I am not so sure how I feel about that. When it comes to store bought, I would rather have "paper" cones than the hard, too-easy-to-crack waffle cones. 

And dressing them up makes these cheap cones even more worthwhile.


Gotta say, the pink is my favourite. 

Kinda cute right? 


and ... LOL moment.  


Grasshopper Ice Cream

Grasshopper Ice Cream 
- for the love of mint... and brownies... and chocolate chips 


I have always loved mint ice cream. An unbelievable amount. 

My go to at the ice cream store? Always mint chocolate chip. And I love Marble Slab but they don't sell mint ice cream... so I stopped going there. 

You get the picture. 

So after making the Cookies and Cream ice cream (courtesy of the recipe that came with the mixer), I set out to make mint ice cream. Only I couldn't find a recipe online that I was confident in. 

So I spent an evening getting inspired at my local bookstore. Best evening ever! I plunked my baker butt down by the racks of baking books and had myself a little read. I came across a book which I already LOVE. It's called Scoop. And I don't think I have put it down since. 

Expect plenty more ice cream recipes from me.

And here is the first. 


Okay, second. But it's the first of the awesome ones. 


Remember those brownies that I so gracefully dropped? I found a use for them! 

Grasshopper ice cream is the perfection fusion - mint, brownies, and chocolate chips - and I set to making it right away. 

I was ambitious and tried to make this as homemade as possible. I found a recipe that seeped mint leaves for 30 minutes in the cream mixture to create the mint flavour. 

The process wasn't pretty. 

And it didn't make the mixture turn the colour I was hoping for either, so I played around with food colouring. 


After I'd strained out all of those mint leaves, of course. 

Here is what it looks like after colouring and cooling. 


Not bad! 

Now, the colour turned out nicely but the flavour was not what I was looking for - it was much too strong! Almost had a sharp taste too it, too. 

Then I realized that that was the peppermint in the Extract of Mint and Peppermint I accidentally used. 

Hmm, so that explains the ever so slightly detectable toothpaste taste. 

"You did what?!"

I know. I knowwww. 

I'm going to work on it. 

And purchase my ingredients a little more carefully next time.


But seriously, who sells a mint and peppermint combo? Not my fault. 

In the meantime, how beautiful did this ice cream turn out to be!


Recipe

1 cup whipping cream
2 cups whole milk
1/2 cup sugar
1/4 cup vanilla instant pudding mix
1/4 teaspoon salt
1/2 cup chopped fresh mint leaves
3 large egg yolks
1/2 teaspoon of mint and peppermint extract (oops!) 

Heat cream, milk, half of the sugar, vanilla pudding mix, and salt in a saucepan. Stir to dissolve the pudding mix. Bring to a simmer. Add chopped mint leaves and cover for 30 minutes, steeping for flavour. 

Strain cream mixture through a fine sieve. 

Beat egg yolks, the other half of the sugar, and mint (and peppermint) extract. Slowly add about 1/3 of the cream mixture to the eggs mixture. Return all contents to the saucepan. 

Add food colouring. I opted for 3 generous drops of green food dye. Although, add one at a time and use your own preference for colour. 

Put the saucepan on medium-low heat for 3-6 minutes. Ensure that the mixture does not come to a boil or the eggs will scramble. The mixture will be ready when it emits steam. 

Remove from heat. Put in a container, laying cellophane along the surface so that a thick layer doesn't form, and store in the fridge for a series of hours (ideally, over night) or in an ice bath for 30 minutes. 

Time for the fabulous mixer! After about 20 minutes of churning, add the brownies and chocolate chips. 

Store the ice cream in a freezer friendly container and let it sit for a few hours to harden up. 

Ta-da! 


Happy!